Contents:
- Logging in
- Home screen
- How to join and start a chat:
- How to chat:
- Statistics:
- Canned answers:
- Personal settings – Name and image:
- Personal settings – Application:
- Team settings – General:
- Team settings – Tags:
- Team settings – Agents:
- Creating a new user:
- Team settings – Customer rating:
- Customize chat – Tab:
- Customize chat – Window:
- Customize chat – Contact forms:
- Chatbot:
- Chatbot settings:
- Chatbot building:
Logging in:
Go to agent.smilee.fi
Or
Go to smilee.ai and click LOG IN

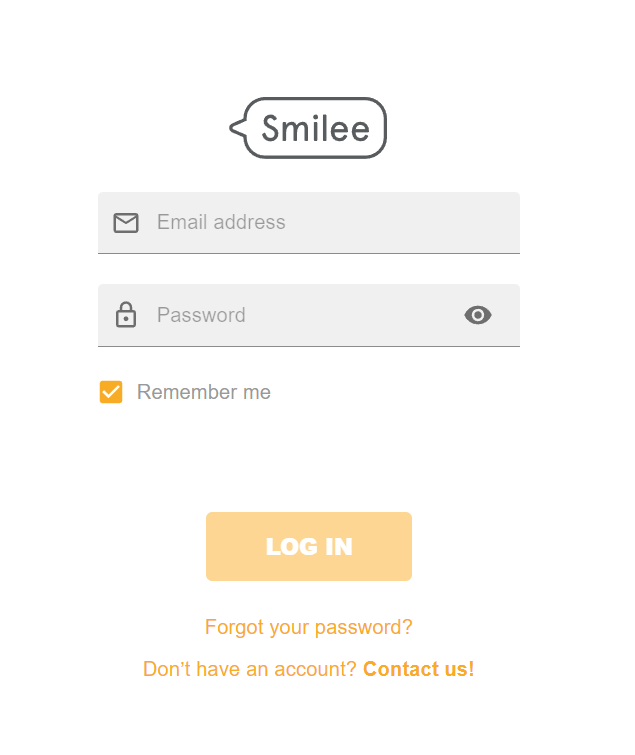
- Enter email and password
- Press log in
Home screen:


In the Home screen you can see your teams, your status, role and fellow agents who are online in each team
How to join and start a chat:
- In Home screen put yourself online in the teams you want to be online in
- Press the main online/offline button so that you are online


- You are now able to join chats from Home screen or Chat screen


- You can also initiate a chat with a web page visitor
- Select visitors tab in home screen
- Select a visitor and initiate a new chat


How to chat:
(Video demo: https://www.youtube.com/watch?v=5aENh2pU4ok )
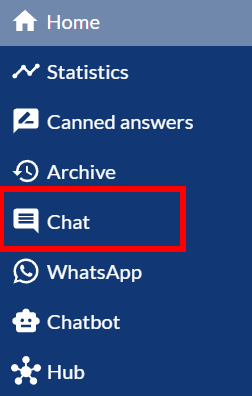
- You can see your open chats by clicking on Chat link

- Chats you are in are shown on the left
- Chat window is on the right


There are several functionalities you can use:
- You can stop the chat
- You can assign that chat to some other agent, for example if you need to take a break
- You can send chat history to team email
- You can copy the contents of the chat to clipboard
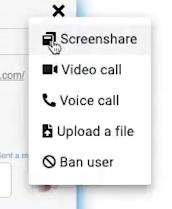
- More features can be found by clicking on three-dots icon on top right corner


- Share screen with a user
- Video call a user
- Voice call a user
- Upload a file to a user
- Ban user

Statistics:


- Check chat statistics from the Statistics link


- Export statistics by clicking on EXPORT-button
Canned answers:
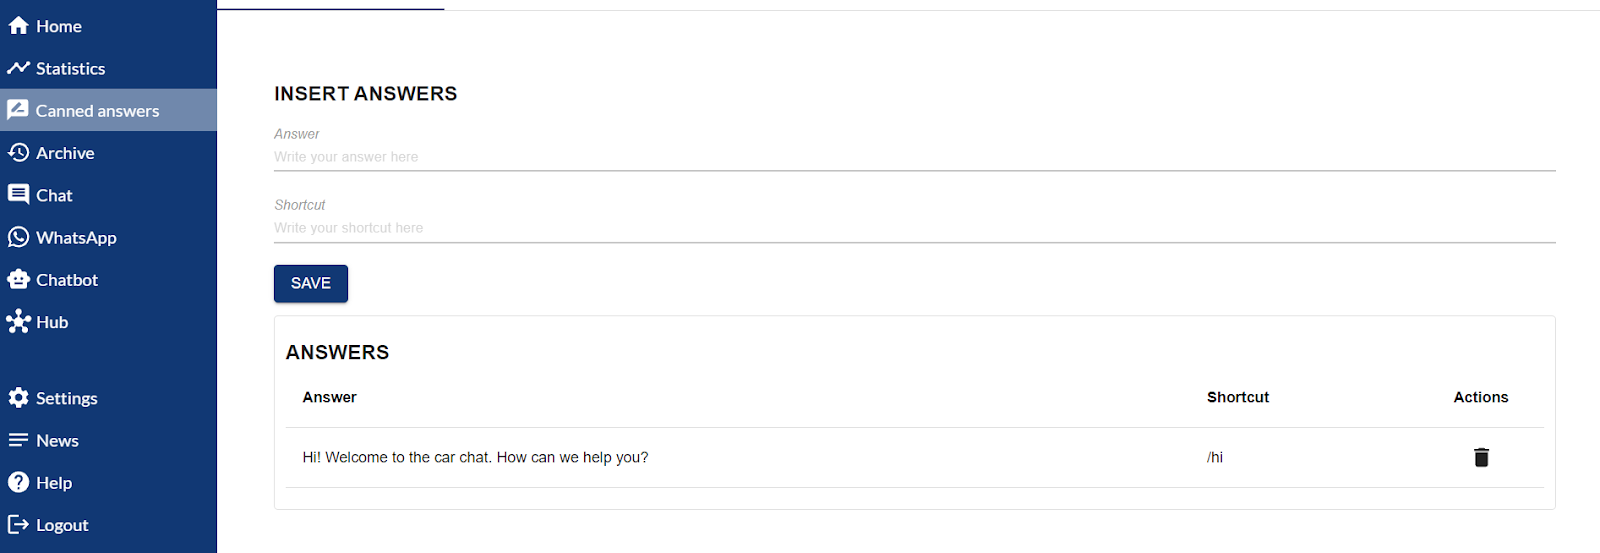

- Create canned answers for quicker and easier responses
Settings
Personal settings – Name and image:


- Set your name and picture to be shown in chat
Personal settings – Application:


- Check your current permissions and test input & output devices


- Change application language
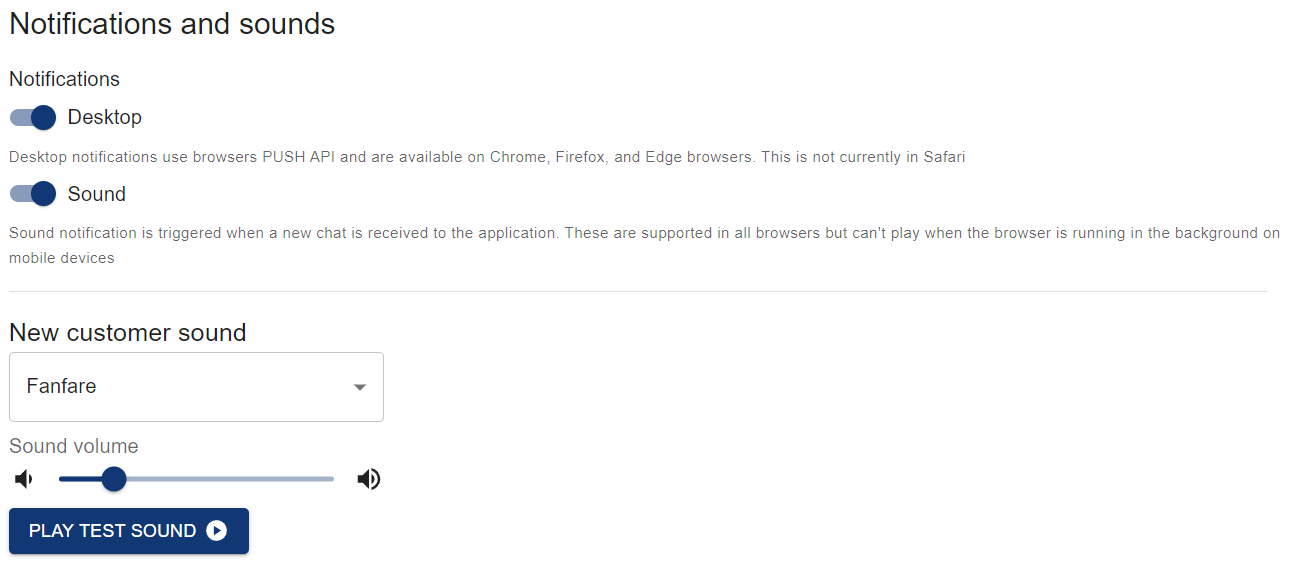

- Check that your notifications are on
- Set sound and volume for a new customer


- Change your default password here


- If you are having issues with the application malfunctioning please click here to clear the application and reload it. If this doesn’t resolve the issue please contact us at support@smilee.ai
Admins:
Team settings – General:


- Set team name
- Select if reporting is mandatory


- Feedback message delay: How long until feedback message is delivered


- Chat overflow timeout: Set time after which chat overflows to a backup team
- Max customer wait time: If no agent picks up the conversation in this time, contact form will be shown
- Keep returning customer chat alive: Set how long an agent sees the returning customer’s chat history


- Set service times for the chat team
Team settings – Tags:


- Set tags for clearer reporting on different levels. For each tag you can set up more detailed sub-level tags, and finally tags for the end result of the chat.
Team settings – Agents:


- See team agents
- Assign roles
- Lead: Can change team settings and add new agents
- Agent: Can join chats, can’t change team settings or add new agents
- Add new agents
- Typing the user’s email and pressing the plus icon sends an invitation email to the user. Registration link in the email is valid for 24h via which the user sets his/her own password to be used for logging in.
- Pressing the Create a new user?-button opens up a view to create a new user manually (recommended):
Creating a new user:


- Add default username
- Create a initial password that the user can initially log in (user should change their password after the first login)
- Add a picture for the user
- This sends an invitation to a new user via email
Team settings – Customer rating:


- Customize the look and feel of customer ratings
- Remember to save
Customize tab:


- Select chat language


- Customize for online/offline desktop and mobile
- Add and customize Attention Grabber
- Customize behavior


- Customize tab colors and default text
- Sync colors and position with other modes (online/offline, mobile, attention grabber)
Customize chat window:


- Change chat title, logo, colors and more
Contact form:


- Add multiple forms with different fields
- You can select these in the Chatbot-flow building
Chatbot:


- Click on the Chatbot link to open Chatbot building with editor


- Settings button: Open Chatbot settings
- Preview button: Open an interactive Chatbot demo
- Import button: Import an existing Chatbot-flow from .txt-file
- Export button: Export Chatbot-flow as a backup or as a copy for example for a new similar chatbot-flow
- Reset button: Reset to empty flow
Chatbot settings:


- Set a name for your Chatbot
- Set Chatbot status to enabled, disabled or disabled while online
- Set the Chatbot type
- Set the Chatbot button style
- Set a picture, like a company’s logo, for the Chatbot
Building Chatbot:
( Video demo: https://www.youtube.com/watch?v=ACrx8Yru09E )

- Add a new view by clicking the “ADD VIEW” button
- Click “SAVE” when you want to save your changes


- Connect views by clicking and dragging from one dot to another
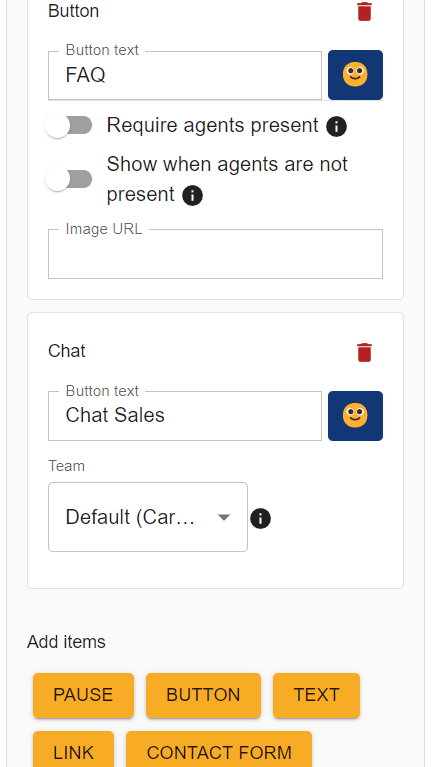

- Add items and configure views based on your needs
- Test your bot in preview
Open fields:


- When linking multiple Open fields in a row, add “send to email/chat” – option to the last Open field and data from all previous Open fields will be included
Metadata:


- Metadata can be added to certain items (Open field, Button, Dropdown).
- Metadata clarifies reporting: Item’s value is linked to its metadata in the report sent to, for example, email.